Hey Quilters! It’s Gina here, and I’m super thrilled to help you dive into the wonderful world of quilting, specifically with sashing! So, let’s get our stitches in a row, shall we?

Quilting With Sashing 101
Ever wondered, “How do I rock that sashing?” both vertically and horizontally? Well, you’re not alone! The ultimate goal is to have your blocks and sashing strips perfectly in sync. While there’s a plethora of methods out there, each quilter has their unique touch. The key? Explore, experiment, and discover your personal quilting groove.
Accuracy is Your Best Friend ❤️
Ensure your blocks are squared-up and uniform in size. A squared-up block is like a perfect square – right angles galore! Even though fabrics are much more forgiving than, say, hardwood, aiming for a close-to-perfect dimension (give or take an eighth of an inch) is crucial.
And don’t forget about the sashing! Precision in cutting is pivotal. Add that seam allowance to your finished width. A golden tip when using a rotary cutter: square-up that cutting edge every few strips. Even if you’re feeling like a pro, that edge might slightly deviate after a few cuts.
Let’s Talk Placement!
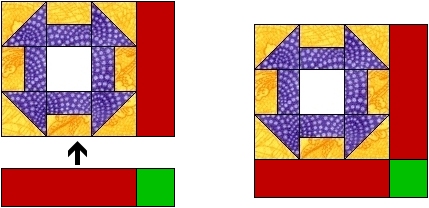
Most quilters go with petite vertical sashing strips nestled between the blocks in each row and then long horizontal strips separating the rows. Now, while some might say, “Measure and cut those sashing strips ahead of time,” I dance to a different tune.
I attach the vertical strips to the blocks, leaving a tad extra on the ends – snipping it off later. Just be sure to pin meticulously ensuring block sides align perfectly.
The same principle applies to horizontal sashing: let a bit hang over on the sides, ensuring the blocks’ sides align. Whether you’re team pre-cut or not, the challenge arises when marrying the block rows with the sashing. But worry not! Here’s my secret sauce:
1. Attach the sashing to the initial block row with their best faces together. Press those seams towards the sashing or let them breathe open.
2. Draw the block lines onto the sashing and pop in a pin. You’ll need two pins for every vertical sashing strip.
3. Position the succeeding block row with their best faces against the sashing, matching block seams with your pins. Pin and stitch them up. Iron the seams either towards the sashing or let them open.
4. Repeat until all the rows are happily joined!
A handy tip: break your quilt top into chunks, like assembling half or a third of the rows at a time. Makes it so much more manageable!
And remember, ironing at every step is magical! The difference it makes to the final look of your quilt is just… chef’s kiss.
Contemplating on adding setting squares at the sashing intersections? You’d need to measure and cut your sashing strips and squares in advance for that.
Add Some Pizzazz!
Your quilt, your rules! Sprinkle in some personality by picking prints, plaids, or textured fabrics for the sashing. Who said it has to be plain or neutral? Be bold and make it pop!
| Quick Guide | Details |
|---|---|
| Block Accuracy | Ensure squared-up and uniform size. Aim for precise dimension. |
| Sashing Precision | Accurate cutting with seam allowance. Remember to square-up every few strips. |
| Sashing Placement | Vertical strips between blocks, horizontal strips between rows. Allow a bit of overhang for adjustments. |
| Ironing | Iron at every step! Either towards the sashing or open. |
| Add-ons | Consider setting squares at intersections. And spice up with vibrant sashing fabrics. |